I love making Envelope Pillow Covers - its a fast, easy project and allows you
to change the look of the room in a very short time! I like change the covers
for the seasons or holidays, so the possibilities are endless. Not to mention I
get my "instant gratification" fix when I whip one of these babies up!! Plus
they make great gifts as well. And they are great to cover up those 'ugly'
pillows too lol
So here is my tutorial on how I make an envelope cover for a pillow. If you do a search online you'll find *tons* of tutorials on how to do this, but this is just my version.
Here's what you'll need for a 16" x 16" pillow:
16" x 16" pillow form
Thread and sewing machine
Rotary cutter, mat and ruler
Sewing pins
Ironing board and iron
Prior to sewing, make sure your fabric has been ironed thoroughly; it will make it easier to put together and will lay nicer when sewing.
Here's my front piece:
So here is my tutorial on how I make an envelope cover for a pillow. If you do a search online you'll find *tons* of tutorials on how to do this, but this is just my version.
Here's what you'll need for a 16" x 16" pillow:
- Front piece for the pillow, sized 17" x 17"
- 2 backing pieces in the following sizes:
- 17" x 26"
- 17" x 18"
Prior to sewing, make sure your fabric has been ironed thoroughly; it will make it easier to put together and will lay nicer when sewing.
Here's my front piece:
Here's my pillow form; this was
purchased at Joann's. You can buy new pillow forms at any craft store, or you
can just use a pillow you already own.
Backing fabric, before I cut and ironed
them LOL I didn't take a picture but for the backing pieces you fold them in
half and iron them, making sure the crease is nice and sharp. After ironing,
your backing pieces should measure 17" x 13" and 17" x 9".
Lay your pillow front right side up. Lay the larger backing piece down on top of the pillow front, crease in the middle and the raw edges on the edges of the pillow front.
Lay the smaller of the two backing pieces down, again with the crease in the
middle and the raw edges on the edges of the pillow front. Pin together.
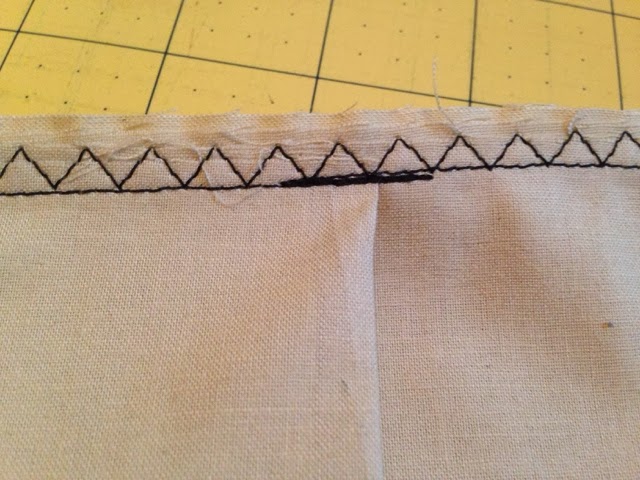
Sew 1/4" around the edges of the pillow
with a straight stitch, going over the overlapped center pieces several times to
strengthen the area, since it will constantly be pulled on when adding or
removing the pillow form. I usually go over it about 4 times back and forth.
When done, do a zig-zag stitch on the edge of the straight stitch. This will
help keep the fabric from unraveling and ruining your pillow cover.
When finished sewing, clip the corners, turn inside out then stuff the pillow
into the case. Viola!!
A back view of the pillow:
Some follow up notes:
- I like having my pillow backs with the double-layer of fabric. To me it adds a little more body to the pillow. If you'd rather only use one layer, most tutorials out there will show how to do that (simply iron a fold on to make a finished edge and sew it up)
- I also like having my backing pieces with a good sized overlap, so that the pillow inside doesn't show through
- The measurements I used above are just what I came up with and liked. If you'd prefer a more snug fit on your pillow, reduce the pillow front size by half an inch as well as the backing pieces
- You can make this cover for any pillow size, really. Just requires some math. Simply add an inch to each side of the pillow form for the front piece (or only 1/2" if you prefer a more snug fit). For the backing pieces, I want the small piece to be an inch past the center of the pillow and the larger piece to be 3 inches past the center. I'll sit down soon and write out the dimensions of the more popular sized form pillows sold in stores to make it easier for you.
I hope you enjoyed my tutorial!! If you have any questions leave a comment and I'll get back to you. And if you end up using this tutorial I would LOVE to see your creations!!!
Take care - Vanessa


